The latest WebWonder is version 5.00 which brings a whole host of new possibilities for the inexperienced and experienced user alike. These few pages give just a taster of what you can look forward to. Here are some of the new features. Click on the links to find out more about them:
Around 70 dialogue boxes have been given new blue ‘i’ buttons. These take you to the relevant part of the electronic manual.
For the main page editor windows of WebWonder, F1 opens the electronic version of the manual at its contents page. This version of WebWonder has made the feature more ‘context sensitive’. If F1 is typed when the pointer is over one of the tool icons in the icon bar, for instance, you will be taken to the relevant part of the electronic manual for the tool. The same applies to the main page menu, if F1 is typed while the pointer is over a menu entry, help for that entry will be sought in the electronic manual.
The filer windows do not take the input focus. However, if a page editor window has the input focus, then F1 with the mouse pointer over a filer window or its menu will provide help as if it did.
NB: F1 in a dialogue box usually invokes an ‘OK’ response, so use the ‘i’ button for help on dialogue boxes.
 Site Searches
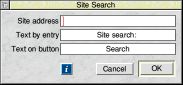
‘Insert>Form>Site search’ inserts a completed form into a page, that calls upon Google to do a search of just your site. The option is greyed if the caret is already in a FORM. The site or server name is assumed to be a domain name. If it is not, the form entry may need to be modified to make it work. It will need to be entered here if the server name has not been supplied in the ISP setup box.
The feature provides a complete form containing 3 hidden elements, the text item defaulting to “Site search: ”, a text field in which the user enters their text and a submit button marked “Search” by default, but you can change it to “GO” or “Find”, etc. The site address, text and button name may all be altered in the dialogue box.
The usual form editing features may be used to subsequently modify any of the components, but the maximum length of the text entry field should not exceed 255.
The ‘finds’ will be listed in new pages supplied by Google and should be familiar to the Google user.
The Search Engine dialogue box now shows not only the number of files with finds but the total number of finds as well and the file limit has been increased to 500.
There is also a spell check button so that directories or selections of files may be spell-checked in a single operation.
 Site Maps:
The structure of the contents of a web site is built up using directories. It is not normally possible to perceive the structure of the whole site by looking at a single filer window.
WebWonder’s new site map can be used to display the layout of a complete web site on a single web page. The feature is called from Site>Create site map... This opens a dialogue box which allows the properties of the map to be chosen.
The first three switches marked ‘Show’ select which file types are to appear on the map. You can keep it to just web pages (HTML files) or include images and other files as you wish.
When the corresponding ‘Link’ switch is off, the map is just a static drawing. Turning the ‘Link’ switches on allows direct access to the files when the page is viewed in a browser, though if this file is to be removed from the site, such links would no longer work.
 In order to make up the diagram, WebWonder uses three small images stored in GIF files. These are kept in a directory called SiteMapSyms inside the !WebWonder application and are copied into the site when a map is created. Again, if the map is to be moved out of the site, these files and their directory should be moved as well.
The web page for the map is created with a white background. Text is normally black unless it is a link. The symbols that join the files and directories are also black. A grey rectangle is shown behind directory name text but this may be disabled using the switch in the dialogue box.
Normally when a new file is created or files are copied into a site, those files are marked for upload. If you do not wish to publish your site map, leave ‘Mark files for upload’ turned off. However, if you subsequently edit your site map, you will have to remember to turn the marking off again, otherwise it will not only be uploaded, but without its symbol images.
Empty directories are never shown. The home page is marked with an asterisk.
WebWonder’s new footnote feature combines some of the properties of hyperlinks with those of anchors. Each ‘footnote’ consists of two parts; a reference in the text to the footnote and a return link from the footnote to the reference in the text.
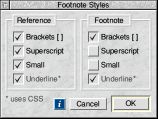 The style of the parts of footnotes can be set for each site. Site>Tools>Footnote styles leads to a new dialogue box which gives choices such as superscript, small, underlined and enclosed in square brackets.
WebWonder and many non-CSS browsers always underline links. In order for WebWonder to remove the underline, a CSS style is given and the effect will only be seen on CSS compliant browsers.
The setting of the style applies to the creation of footnotes only. If you want to alter their appearance once created, the usual editing features should be used.
Insert>Footnote leads to a choice of Reference or Note with the next unused number in the writable icon. On selecting the option, the new reference or note is placed at the caret position. (Neither may be placed inside an existing link.)
The File>Footnotes sub-menu, as for anchors, gives the possibility of locating references or notes and of listing them for a page.
WebWonder’s navigation button definition dialogue box allows for the definition of a ‘previous’ or ‘back’ button along with a ‘next’ button. These imply that a linked list of pages may be created. If only ‘next’ buttons are used, the list is considered to be unidirectional in that one may only move forward through the list. The use of the ‘previous’ button allows one to move freely in either direction through the list and therefore makes it bidirectional.
When the contact sheet feature is used in conjunction with these buttons, a linked list is created. WebWonder’s new linked list editing feature has been designed to help with the modification of such lists.
The Linked list editor can also handle page menus. These change the way it works.
The feature is accessed through the Site filer menu for a single file. Which file is chosen to start from is important. For a bidirectional list, it will be scanned in both directions so its whole bidirectional portion will be listed. If the list is initially accessed through a unidirectional link, as can be the case when starting a tour of pictures from a contact sheet, It would be better to start from the sheet page if its links are likely to be affected by any modifications anticipated. For a unidirectional list, the displayed list will start with the chosen file as there are no ‘previous’ buttons to trace backwards so if the whole list is to be considered, the first file in the list should be the one that the editing is called from. (The ‘Used by’ report can help in finding what files call upon another.)
It is also possible to call Linked list editing for a file that is not in a list, allowing the possibility of using the feature to create a linked list.
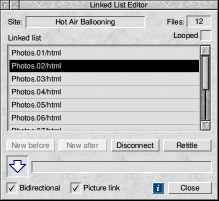
Three actions are possible via the Linked list edit dialogue box. The first two are very similar in that they both add a file to the list. The only difference is whether the new file is placed before or after the selected file. The ‘selected’ file is the one highlighted in the scrolling list. The selection may be altered by simply clicking on the name required.
When a file is to be added to the list, it is dragged from its site filer window onto the Linked list edit dialogue box. Its name will appear in the relevant icon. It must not be part of this or any other list. It may contain a picture that may acquire the same link as the ‘next’ button that will be created, as is possible with the contact sheet feature. The file should have neither ‘previous’ nor ‘next’ buttons. This should be borne in mind if the Thumbnail dialogue box is being used to create the page. ‘Home’ and/or sheet buttons may be provided via Thumbnail, but the ‘previous’ or ‘next’ buttons will be supplied by the Linked list editor.
When the ‘Insert before’ or ‘Insert after’ button is clicked the file will move into the list. It will acquire its button(s) and links and the adjacent files will be modified to reflect its inclusion in the list.
The ‘Disconnect’ option removes the ‘selected’ file from the list. The ‘previous’ and ‘next’ buttons will be removed from it and if the picture contained a link that matched the ‘next’ button, the link will also be removed. The adjacent files will also be modified to patch over the removal of the file. No confirmation is requested as the file is not deleted, merely disconnected from the list, and therefore may be reinserted.
When the dialogue box is first opened, the list is scanned to see if it is bidirectional and if there are any pictures whose links match those of ‘next’ buttons. These settings are then reflected in the switches at the bottom of the box. The switches may be changed at any time manually. If a list is being created using this feature, the switches should be set manually to reflect the nature of the list desired.
Looped lists will be detected and may be edited. This feature may neither be used to break a list or to join two lists. Up to 500 files may appear in the edit list. Page menus and the Linked list editor:
When page menus are detected by the Linked list editor it changes the way it works. Once it has found a menu, it uses it to determine the size of the list. In this way it establishes all the files that will need to have their menus updated.
When a file with a page menu is disconnected, its entry is removed from all menus, including its own.
When a file with a page menu is inserted, its entry is added to all menus, including its own. If the file being inserted does not have a menu but menus are being used, a menu will be added at the end of the file. This will need to be moved to the required position and the correct file selected in the menu.
Changes have been made to the handling of Forms in WebWonder. Many of these have been to support changes made by PayPal. New commands have been added and field lengths extended.

The layout of the form box has been simplified. The encoding is now a writable with a menu for frequently used options. The menu is defined in the Messages file and so may be added to or altered. The new Action/URL menu is also in the Messages file.
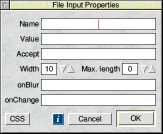 Form File input:
The form component box has a new entry added at the bottom for file input. It looks rather like a text input box but may have a file dragged to it in the browser to load the name of the file to be uploaded by the form. The form encoding “multipart/form-data” should be used with file upload.
The VALUE may be left blank or set to an initial file name, though this is usually changed before upload. The ACCEPT entry is intended to be a list of acceptable file types but appears to be ignored by many browsers.
A new switch called ‘Compact’ has been added to the calendar dialogue box to modify the day entries for diaries. Normally day entries are in two paragraphs but compact will cause the empty paragraph to be omitted and the CLOSED information to appear on the same line as the date.
A new key short-cut ^] has been created to assist in moving between the calendar and diary pages. If this is issued when the caret is in a date with a link in the calendar, it will open the diary page and select the anchor for the appropriate date.
If ^] is issued in a diary page then the calendar will be opened and the date selected, if it is accessible.
^] will bleep if it is unable to perform the expected task.
The CSS interpreter has been greatly extended to include constructs such as table.main {... }, where the classes and ids are defined just for a specific HTML entity.
Nested constructs such as table.main td {... } are not supported, but input [type=“text”] {... } etc. should work but the font face and size will not be altered in WebWonder.
It is also now possible to turn the underline of a link on and off during ‘hover’.
The CSS box and CSS find box have had new icons added to show which HTML entities are being dealt with. It is now possible to track down a ruling HTML style where no class or id is involved. Once the file has been found, the line number of the first matching tag is shown.
One of the original design philosophies of WebWonder was to hide the HTML code from the user. All unnecessary formatting is removed and the code is saved in its simplest form for maximum transmission speed.
Subsequently, experienced users have been using WebWonder on their hand coded pages and were disappointed that their formatting had been lost.
In response to this, a ‘Format’ entry has been added to the ‘Site>HTML output’ menu. This depends upon a file called ‘HtmlFormat’ in the WebWonder application and the option is greyed out if the file is not present. The file is only used when ‘Format’ is ticked, otherwise the original WebWonder compact output is provided.
The file contains all the formatting information for every HTML tag that WebWonder handles. Only one file may be used at a time, that file being shared by all sites. The file is a text file and may be edited by the user. Anything that appears after a semicolon is taken as a comment.
A line beginning with a number indicates the number of spaces each indent step should be. This may optionally be followed by a comma and another number which will be taken as a limit in characters beyond which plain text should be wrapped.
All remaining non-blank lines define the formatting for each tag. Tags that do not have a </...> close form may not cause indents. Each tag is followed by a comma separated list of either Y or N (upper or lower case) to determine the settings. Missing entries are assumed to be N or off.
Four switches are possible:
In addition to the normal HTML tags, an extra one has been provided to designate an anchor - a <A NAME=“...”></A> pair so that this may be treated as a single unit and formatted differently to the usual <A> command. The anchor is denoted by a ‘#’ character.
A sample HtmlFormat file is provided but this may be tailored to suit your individual preferences. The HtmlFormat file is only used when a page is saved. If it has been modified since it was last used, then it will be reloaded, so the effect of changing settings may be tested without having to leave WebWonder.
It is now possible to import and export family tree data from other software sources by using GEDCOM files. These files should be of type Text (&FFF) or type FamTree (&D78). The first six characters of the file must be ‘0 HEAD’. GEDCOM version 5.0 to 5.5 is supported.
The importer works by filling in forms for individuals. A sample form is provided, which may be altered or replaced entirely. The location of the data extracted from the GEDCOM file is indicated using anchors with names three or four characters long. These are invisible in a browser. A file is created for each individual with a name derived from the person’s name. Additionally, an alphabetic index of the individuals sorted by surname order is provided, with links to the individual’s files.
In addition to entering the data into the form, WebWonder creates links to other individuals referred to in the record, such as parents, spouse, children and other associated individuals. These links make navigating through the family data very straightforward. To use the importer, you will need a master page which will act as a template form. (Two samples are provided.) It is as well to create a new directory to receive the data and copy (not move) the template into it. At the end of the import process the directory will be filled with a page for each individual plus a file called -index.html, with them all listed. The master page will not be altered.
WebWonder uses special anchors to determine where on a page the data should be placed. These can appear in any order on the master page.
GEDCOM files may also be exported from WebWonder. Family data may be edited or entered entirely by hand.
During the automatic linking, much more than the usual links to parents, children and spouse(s) can be supplied. Relationships such as siblings, half-siblings, grandparents, grandchildren, great-grandparents, great-grandchildren, uncles and aunts, nephews and nieces, cousins, parents-in-law, brothers and sisters-in-law and sons and daughters-in-law, can also be provided as links. Each of these names is also a link so navigation through the family is delightfully easy.
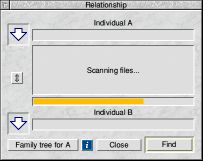
A special dialogue box exists to test the relationship between any two individuals and a small Windows program is also offered to download for free, so that others can use this to test the relationships in the HTML files you have created. Click here to download it or direct other users to: www.dsnell.co.uk/ftp/Relations.exe (Note upper case R.)
If you still want to create a family tree, WebWonder will do it for you. It will produce it as a Draw file, which may be edited. It can then be converted to a PDF using my Draw2PDF program if you want to share that as well.
A special Guide page is supplied to help with the filling in of the forms. It can be viewed here .
Click here to see a sample page from my own family data. You will be able to see that person’s relation to me and you will also notice that she married her cousin - something that is not so easy to spot from looking at a family tree. All of the links lead to a dummy page, as I don’t want to put the whole thing on the web site, but there is enough there for you to estimate the power of the concept.
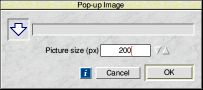 Pop-up images:
There is a new entry in the Insert menu for Pop-up images. This entry opens a new box to which the image file icon should be dragged. The box also contains a writable size icon which may be initialised using the DEFPICSIZE parameter also used for GEDCOM import.
When OK is clicked on this box, an image is placed on the page such that its major dimension matches the size value and its aspect ratio is preserved. The image also has a link placed on it that will open the original image in a new window at its original size. No thumbnail is used. The image on the page is a reduced view onto the larger picture. While on old dial-up systems this may be a slow and inefficient way of doing things, on broad-band this is rarely a problem, unless it is a very large file.
This is the way the GEDCOM importer handles pictures on individual’s record pages and should be used to add further pictures to such record pages.
The following key short cuts are now available when the caret is in the Hyperlink box:
^L emulates a click on the left pointing button alongside the Page title icon. |
A file of URL type (&B28) may now be dragged into a WebWonder page. This will create a link to the URL and show the appropriate part as the text of the link.
The table background for a contact sheet is now left unset, rather than forced to white and is now definable on the Contact sheet dialogue box.
Previously, the captions icon on the Slide Show dialogue box was read-only. Now it may be set if no captions are provided in the text file. In this case the image file names will appear as captions. Similarly, the switch may be turned off to suppress supplied captions.
New Choice setting ‘Sort by type’ and ‘Display>Type sort’ cause icons in site filer windows to be grouped by file type.
New improved auto-sizing for filer windows. No more overlapped text.
The title viewer is a strip like the status line in a page editor window. When the mouse pointer is over an HTML file in the filer window, the page’s title will be displayed in the viewer. This will show a person’s name when over a genealogical page.
It may be switched from the display menu or by using the new button on the filer window’s tool bar.
This new facility is either available from the display menu or by clicking MENU over the filer window’s tool bar. The letters entered into the writable will be used to locate the file names that start with the nearest match. The filer window will be scrolled to bring the name into view. This can be very useful where a directory contains a large number of pages, as is often the case when dealing with family data.
In addition to fixing the bugs that had been reported, there have been many small additions and alterations to improve your WebWonder experience. Things like whole table selection, a Move option for Forms, the ability to exclude pages from crawlers, ADJUST click on the icon bar icon to open the site list.
There is also an ‘Inhibit transfers’ button on the ISP setup box that allows you to temporarily block transfers without having to remove any of the ISP data.
The saving of text from pages, particularly in tables, has been improved and a ‘whole page’ save is now possible. TSV files may now be imported and exported for tables.
The TABINDEX parameter is now stored by WebWonder and passed through unchanged.
And so on...
Two new features came in too late to be in the mailed newsletter and manual:
Finding the Home page:
Clicking MENU over the 'Home' button of a site filer window toolbar for a window that contains the home page, will scroll directly to the home page. This works even if the 'Home' button is greyed.
Closed periods for Calendars:
It is now possible to set up closed periods for a calendar by creating a text or CSV file that contains the dates for closure. Each line starts with a month number and is followed by a comma separated list of closed days for that month. A range may be specified by separating two day numbers with a hyphen. Blank lines and anything after a semicolon are ignored..
Drag this file on to the Calendar dialogue box. Although nothing will appear to happen at the time, the periods will be treated as closed when the calendar and diary are created.
Dragging the file with Ctrl held down will treat the year as closed and the entries in the file as open days.
In the next version, there will be something on the dialogue box to show that the file has been loaded and the feature will be extended.
This page give just a taste of what is new. There is a lot more for you to discover.
Despite the significant increase in size of the manual and increased postal rates, the price of the upgrade has been held.
The manual has been extended to 184 pages, with three new chapters and one new appendix, as well as a completely revised index.
For the time being, version 4.00 will continue to be supported for those who don’t wish to upgrade but this support will be withdrawn on 1st January 2011.
Two upgrade options are offered:
For UK users that already have version 2.00, 3.00 or 4.00, the cost of the upgrade will be £25, which will consist of the new 184 page manual (unbound) and a free CDROM† containing all the latest versions of the various programs. The pre-punched manual pages will go in the ring binder shipped with version 2.00 and later.
For UK users that still have version 1.03 or earlier, the upgrade will cost £30 and includes the manual in a ring binder, with the free CDROM.
Don’t forget to supply your WebWonder serial number.
† If you would rather have just the files that have changed e-mailed instead of the CDROM, let me know when you e-mail your serial number and remember to let me know whether you require the 26 or 32 bit version.
![]()